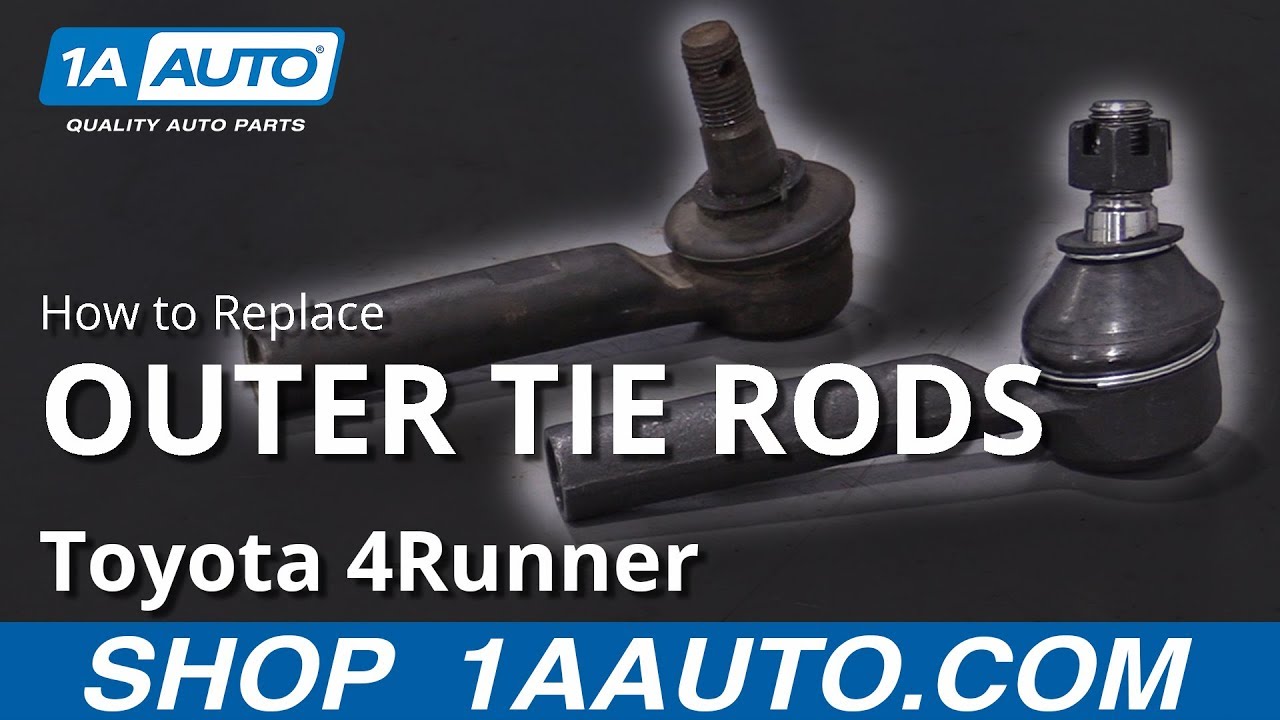
How to Replace Outer Tie Rod Ends 2003-09 Toyota 4Runner
Created on: 2019-10-30
Check out this video to learn how to replace the outer tie rods on your 03-09 Toyota 4Runner.
-
step 1 :Removing the Wheel
- Loosen the 21 mm lug nuts
- Raise and support the vehicle
- Remove the lug nuts
- Remove the wheel
-
step 2 :Removing the Outer Tie Rod
- Loosen the tie rod jam nut
- Remove the tie rod end cotter pin
- Loosen the 19 mm tie rod end castle nut
- Hammer on the knuckle to loosen the tie rod end
- Remove the nut and remove the tie rod end from the knucke
- Unscrew the outer tie rod from the inner tie rod, while counting how many turns it takes to remove it
-
step 3 :Installing the Outer Tie Rod
- Apply anti-seize to the inner tie rod threads
- Install the outer tie rod onto the inner tie rod
- Turn to tighten the new tie rod, using the same number of turns as removal
- Insert the tie rod end into the knuckle
- Install the 21 mm castle nut
- Torque the 21 mm castle nut to 67 ft-lb, then continue tightening, if necessary, to align the cotter pin hole
- Install the cotter pin and peen the ends
- Tighten the jam nut against the outer tie rod
-
step 4 :Installing the Wheel
- Install the wheel onto the wheel studs
- Install the six 21 mm lug nuts and tighten them by hand
- Lower the vehicle with minimal weight on the wheel
- Torque the six 21 mm lug nuts to 83 ft-lb
- Lower the vehicle completely
Tools needed
-
21mm Socket
Side Cutters
Hammer
Socket Extensions
Torque Wrench
Rubber Mallet
Jack Stands
19mm Socket
Ratchet
Floor Jack
Pliers
Hey, friends. It's Len here from 1A Auto. Today, we're gonna be working on our 2006 Toyota 4Runner. And I want to show you how to replace your outer tie rod ends. If you need these or any other parts, check us out, 1aauto.com. Thanks. Okay. Friends, so it's time to remove our wheel. To do that, you're gonna remove all of your lug nuts, you can use a 21-millimeter socket. If you're gonna be using a ratchet it might be easier to do this while the wheel is still on the ground so it can't spin while you try to loosen up your lug nuts. I'm using an air gun, so I've got my eye protection, my hand protection. Here we go. This one I'm gonna leave on a few threads. Now I have a spare hand will try to wiggle this around. A lot of times on Toyotas they don't want to break for you right away. It's not really that big of a deal, you could use something as simple as a rubber mallet or if you have a pry bar. Either way, what you want to do is make sure you have a lug nut on, at least a couple threads but it's still nice and loose.
I'll come right under here, I'm gonna bonk right on the edge of the rim. Okay, if you're using a real hammer that's not a rubber mallet, definitely don't hit your rim you'll mar it up, cause issues. You could try bonking on the tire you just have to be careful because when you bonk it's gonna want to come back. Rubber mallet right on the rim. There we are. That lug nut did his job, made it so the wheel didn't come falling off and hurt anybody. Super important, safety is number one. Take our wheel off and we'll roll it out of the way. Okay, so right here is your tie rod jam nut, we're gonna use a little bit of penetrant spray. That's gonna do its job, work its way into the threads right here.
Nice long set of pliers, it's gonna grab right onto that jam nut, break it free just like that. I'm gonna remove this cotter pin right here, if you have access to new ones go ahead and cut it. If you have to reuse it, well, obviously, don't cut it. But I do have access to new ones so I'm just gonna cut it right out of there. I'm gonna remove this now. I've got my 19-millimeter socket and an extension, I'm using an air gun but you can, of course, use a ratchet. You do you, boo-boo. Now I'm gonna take a hammer and I'm gonna give the knuckle a couple of bumps just right up along here. I'm gonna be careful not to try to damage my nut, the threads of my tie rod, or of course, break the boot. Maybe it matters, maybe it doesn't to you. That broke free. The reason for putting that out on there like that is just so when it did break free, it didn't come falling down, potentially hurt me, break anything, super important.
Now we're gonna take our tie rod and we're gonna count how many times we come all the way around to the straight-up position. And you're also gonna take note that when you took the tie rod out, the stud was going up through the knuckle not down. Ready? 1, 2, and so on 3, 15. So it took 15 turns to go from straight up and down all the way around to straight up and down as it came off. Keep that in mind. Write it down if you can't remember, that's fine. I'm just gonna give this a little blast of Never-Seez just like that, jam nut. It's probably pretty decent. Okay, so we're gonna get this outer tie rod end on here. We're gonna count it out for our 15, right? So we'll find where it starts. Okay, here it started. 1, 2, 3 and so on 15. So that's our 15.
Slide this up and into its hole, that's where it's happy. You want to make sure that this hole is facing front to back, it's gonna make your life easier. If it isn't, just bonk this out, grab down here on the stud, grab some pliers and just twist it, it should turn fairly easily. Brand new slotted slash castle nut. So we're just gonna snug this up using our 21-millimeter socket. Okay, that's fairly snug. Let's find the torque specification, we'll torque it down. Okay, so it's time to torque down our outer tie rod end nut. We're gonna torque it to 67-foot-pounds. Just check it one more time. Awesome.
So now what we're gonna do is we're gonna take a look at our tie rod jam nut here and we're gonna see if it lines up with where it's supposed to. If it doesn't line up between the hole and one of the slots, you need to continue on to the next hole by tightening. You never want to loosen it up to the next hole or to the hole previous, I guess you would say. You want to continue tightening until you get to the next hole. All right. So let's get one of these slots lined up with the hole. I got my 21 socket, it's pretty close. Perfect.
I'm gonna install the cotter pin straight through just like this. Then use my cutters, you can use pliers or whatever you want. You can probably you can use your fingers for these things. You just kind of bend them so that the ears come up and over the top. Some people like to go from one side to the other side, you could do whatever you want as long as the ears that come out the other end are bent to the point that the cotter pin cannot come out. The cotter pin is what locks this nut in. If the cotter pin for some reason came out, the nut came loose, your tie rod end falls down, your wheel can do whatever it wants to do, so we'll prevent that. That looks good.
We're gonna go ahead and snug up this jam nut real quick, that feels good. Just grab the tie rod, move around a little bit, maybe. Okay, I've got it, so it's pretty much straight. That looks good. It's gonna move around as we drive anyway, it's gonna do its own thing, but anyway. So we know that this is tight, we know that this is tight, let's move along. Now we're gonna grab our wheel. These wheels can be heavy and I don't want you hurt yourself so instead of grabbing your wheel like this and trying to lift with your back and potentially hurting yourself, I'll show you a little secret. You take your leg, assuming you're not worried about your pants getting a little dirty, I'm just gonna grab it like this, roll it right up your leg.
And now you can use your legs/ab muscles to lift it right up, use your leg to hold it. Balance it. See? That works pretty good. I'm gonna take my lug nut, my socket, put it right on here. Now that we know we've got one locked in, we can release it, grab the rest of our lug nuts. We're gonna start all these on. We'll bottom them out and then we'll torque them down. All right, so let's bottom out these lug nuts. Perfect. We'll get this down on the ground and we'll torque them down to manufacturer's specifications. Okay, friends, let's get our torque down. We've got our 21-millimeter socket, we've got our torque wrench set to 83-foot-pounds. We're gonna go in a crisscross manner. Okay. I'm just gonna go around one more time. It's a small price to pay for safety. Awesome.
Thanks for watching. Visit 1a auto.com for quality auto parts shipped to your door, the place for DIY auto repair. And if you enjoyed this video, please click the subscribe button.
Shop Products


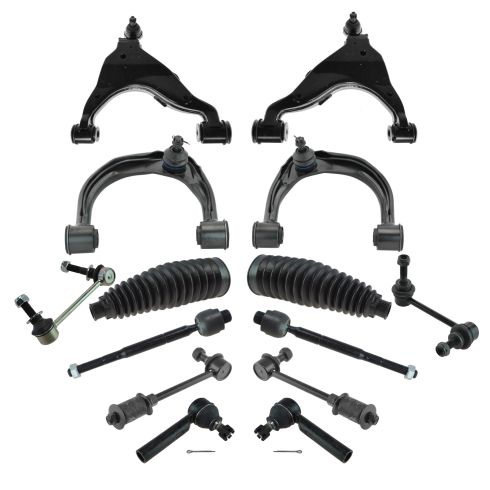
Toyota 4Runner Lexus GX470 Front & Rear 14 Piece Steering & Suspension Kit TRQ PSA43286
Part Details:
- (2) Front Sway Bar Links
- (2) Rear Sway Bar Links
- 14 Piece
- (2) Front Steering Rack & Pinion Bellows
- (2) Front Lower Control Arms with Ball Joints
- (2) Front Outer Tie Rods
- (2) Front Upper Control Arms with Ball Joints
- (2) Front Inner Tie Rods

How to Replace Front Outer Tie Rod Ends 2002-06 Nissan Altima
How to repair, install, fix, change or replace a broken, busted, bad, loose, or damaged tie rod on 02, 03, 04, 05, 06 Nissan Altima.
