How to Replace Window Regulator 2003-04 Honda Odyssey
Created on: 2013-01-28
Check out the steps needed to replace the window regulator on your 03-04 Honda Odyssey.
-
step 1 :Removing the Door Panel
- Pry up the screw cover inside the door pull with a flat blade screwdriver
- Pry up the screw cover inside the door handle with a flat blade screwdriver
- Remove the Phillips head screw from the door pull
- Remove the Phillips head screw from the door handle
- Pry the window switch panel off with a flat blade screwdriver
- Disconnect the wiring harnesses from the window switch
- Pull the door handle forward and off
- Unclip the latch rod from the door handle
- Disconnect the door lock wiring harness
- Pry off the mirror base trim panel with a flat blade screwdriver
- Pry the door panel off by hand
- Lift the door panel up and off
- Disconnect the speaker wiring harness
-
step 2 :Removing the Window Regulator
- Remove the Phillips screws from the window control box
- Remove the two Phillips screws from the control box bracket
- Pry off the rubber plugs with a flat blade screwdriver
- Peel back the watershield
- Raise the window by hand to access the bolts
- Remove the two 10mm bolts that hold the window to the regulator
- Raise the window
- Hold the window in place with painter's tape
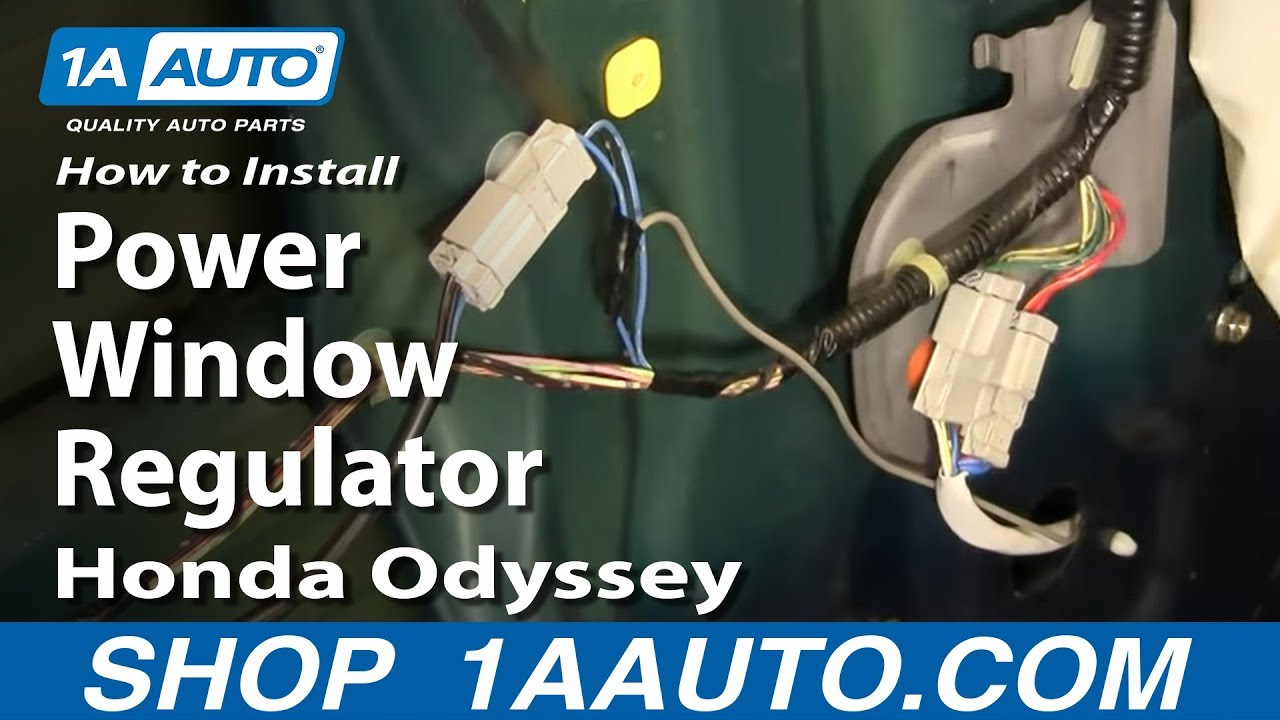
- Disconnect the window motor wiring harnesses
- Remove the Phillips screw from the window motor plate
- Remove the wiring connectors from the plate with pliers
- Remove the seven 10mm bolts from the window regulator
- Pull the window motor up and out
- Pull the regulator out of the door
-
step 3 :Installing the New Window Regulator
- Remove the bolts from the old regulator
- Install the bolts into the new regulator
- Put the new regulator into place
- Hang the regulator in place by the top bolt
- Hang the window motor in place by its bolts
- Pull the window motor wiring harness through the door
- Tighten the seven 10mm bolts into the regulator
- Clip the wiring connectors to the motor plate
- Connect the wiring harnesses
- Put the plate into place
- Insert the Phillips screw into the plate
- Remove the painter's tape from the window
- Slide the window down onto the regulator
- Insert the two 10mm bolts that hold the window to the regulator
- Connect the window switch wiring harness
- Turn on the ignition
- Test the window with the switch
- Turn off the ignition
- Disconnect the window switch wiring harness
- Put the watershield into place
- Insert the rubber plugs
- Put the window control box bracket into place
- Insert the two Phillips screws into the control box bracket
- Put the control box into place
- Insert the two Phillips screws into the control box
-
step 4 :Reinstalling the Door Panel
- Connect the speaker wiring harness
- Lift the door panel into place
- Push in the door panel clips
- Push the mirror base trim piece into place
- Connect the door lock wiring harness
- Clip the latch rod to the door handle
- Push the door handle into place
- Connect the window switch wiring harnesses
- Push the window switch panel into place
- Insert the Phillips screw into the door handle
- Insert the Phillips screw into the door pull
- Put on the screw cover in the door handle
- Put on the screw cover in the door pull
Tools needed
-
Flat Blade Screwdriver
Phillips Head Screwdriver
10mm Wrench
Painter's Tape
10mm Socket
Ratchet
Brought to you by 1AAuto.com, your source for quality replacement parts and the best service on the Internet.
Hi, I'm Mike from 1A Auto. I hope this how-to video helps you out, and next time you need parts for your vehicle, think of 1AAuto.com. Thanks.
In this video, we're going to show you how to replace a front power window regulator on this 2003 Honda Odyssey. It's pretty much the same for any '99 to '04 Odyssey. We'll show you the driver's side door. The passenger's side door is the same procedure. Tools you'll need are a small flat blade screwdriver, Phillips screwdriver, a 10 mm socket and ratchet . or a 10 mm wrench will work as well ., and some painter's tape.
Start with a small screwdriver, and if you look into this cup here, there's a little trapdoor. Pry up and you can see a Phillip's screw there. Then, there would be another trap door here, but it's missing on this vehicle. There's a Phillip's screw there. Remove these two Phillip's screws. Pull up and back on this. Pull it out. There's two connectors. They both have just little tabs right in the middle top here on this blue one. Press it down. On this brown one, press down. Pull it out. The door handle pulls forward and then out. Again, there' a clip here on a rod. Just push that clip either with your finger or the screwdriver. Push that clip around. Pull the rod up and out. Then there's a connector here. Pull that off. Put a small screwdriver right up here. Pull this out a little bit. Work the screwdriver underneath. Pry it out. Pull that up. Here at the bottom, work your finger underneath and pull firmly. Release the clips. They're probably not going to release if your door panel has never been off, it may be a little more difficult to release. Release those clips and lift your panel up and off and then your speaker is connected right down here. There are two tabs on each side. Just squeeze the connector and pull it off.
Now, using a Phillip's screwdriver remove the control box and the bracket and then carefully pull. Actually, you have two plugs at the top. Use a flat blade screwdriver, pull off the plugs and then slowly remove the water shield. Around the speaker, it's a little stickier so we just kind of left it in place to do the work.
Next, we're going to remove the window and this is a cable operated regulator. So, if you kind of reach back here, normally, what happens is the cable breaks or some part of it breaks and you can actually just grab onto your window and move it up and down by hand. You want to move it into a position so that when you look through these holes, you'll see a 10mm bolt and that 10mm bolt holds the regulator onto the window. There's two 10 mm bolts you want to remove here and here. Now use a 10mm socket with a ratchet and extension. Remove those bolts. You could also use a wrench just by reaching in through the door, but the socket and ratchet will be much easier. Now, just slide the window up with your four hands. You can see we have a little helper there. Just tape the window up using some painter's tape to hold it in place.
Now, your window motor is plugged in on a plate down here. There's little tabs. Just push the tabs in. Pull out and then use a Phillip's screwdriver to remove the screw that holds that plate on and then a pair of pliers to squeeze the clips in back and pull the connectors off of the plate. Then there are three bolts here. You're going to remove this one and loosen these two and then you'll remove these two down here. Remove this one here and either loosen or you'll have to remove this one up here. Now I'm going to use my 10mm socket with ratchet and extension, again, and remove those bolts. Just fast forward through it here. Now, reach down in and pull the window motor up and out. Push the harnesses through the door and then reach in and remove the regulator.
The new regulator from 1A Auto is on the left. The old regulator is on the right. You can see everything is the same. The connectors are all the same, if you compare the connectors side-by-side. They have the clips on them and everything, just like the original. Now, hold both regulators side-by-side and you'll take a couple of the bolts out of the old regulator and motor. Just transfer these bolts into the new regulator. That just makes it a little easier when you go to install it. Let's speed it up here a little bit as I put the regulator back into place and hang the rail up by that one bolt at the top. Then, I make sure that the two bolts line up and hang up the window motor. Pull the plug through and then really speed up here as I just put the rest of the bolts in and tighten everything up nice and firm. Make sure you put on the little clip that's lower on the harness. It clips into the door from the backside and then clip the connectors to the plate. After you do that, make sure you plug everything back in and then re-install the plate with the Phillips screw. There's a little tab at the bottom that slides into the door and then the plate just installs with that one screw. Remove the tape that's holding your window up. Slide the window down to line up with the regulator. Now, use your socket and ratchet or your wrench and put those two bolts back in. Tighten them up and after you tighten them up we can reconnect your window switch and do a little test.
Now, we can just put the water shield back in place. Kind of stick it all back on where it goes. Put the little plugs in at the top. Then, use Phillip's screwdriver and remount the bracket for the door panel as well as the control box. You have to beat all those tabs. There's a little tab at the bottom. Push that in and down. For your door handle, reconnect our door lock if you have it. Pull this rod out. Put it down in. Flip the clip around and lock it on. The handle goes in. Slide it back. We kept the blue clip in the back, brown clip. Put the front in first. Slide if forward, down and in. Put the screws back on.
We hope this video helps you out. Brought to you by www.1AAuto.com, your source for quality replacement parts and the best service on the Internet. Please feel free to call us toll-free, 888-844-3393. We're the company that's here for you on the Internet and in person.
Shop Products


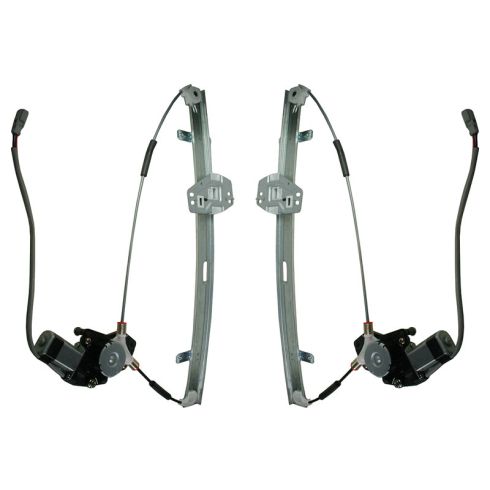
1999-02 Honda Odyssey Front Driver & Passenger Side 2 Piece Power Power Window Motor & Regulator Assembly Set TRQ WRA50536
Part Details:
- Power
- 2 Piece
- (1) Front Driver Side Power Window Motor & Regulator Assembly
- (1) Front Passenger Side Power Window Motor & Regulator Assembly

How To Replace Rear Power Window Regulator 1996-2000 Honda Civic
How to repair, install, fix, change or replace a weak, noisy, damaged or defective power window motor on Honda Civic, years 96, 97, 98, 99, and 00.
