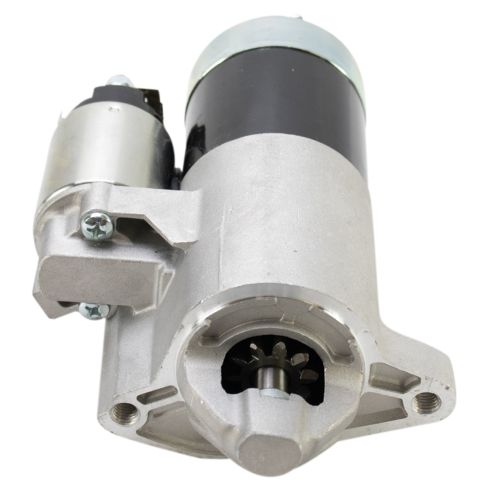
Upgraded design utilizing aerospace-grade lubricates and oil-impregnated bronze-sintered bushings
Item Condition:New
Attention California Customers:
WARNING: This product can expose you to chemicals including Lead and Lead Compounds, which are known to the State of California to cause cancer, and birth defects or other reproductive harm. For more information, go to www.P65Warnings.ca.gov.
Lifetime Warranty
This item is backed by our limited lifetime warranty. In the event that this item should fail due to manufacturing defects during intended use, we will replace the part free of charge. This warranty covers the cost of the part only.
Returns: Parts with electrical components cannot be returned once installed.
FREE Shipping is standard on orders shipped to the lower 48 States (Contiguous United States). Standard shipping charges apply to Hawaii and Alaska.
Shipping is not available to a P.O. Box, APO/FPO/DPO addresses, US Territories, or Canada for this item.
Expedited is available on checkout to the United States, excluding Alaska, Hawaii.
Final shipping costs are available at checkout.
How To Replace Engine Starter 2002-07 Jeep Liberty
Created on:
Tools used
12mm Socket
13mm Socket
15mm Wrench
Hammer
Flat Blade Screwdriver
15mm Socket
Jack Stands
8mm Socket
10mm Socket
Ratchet
Floor Jack
Assistant
1. Disconnecting the Battery
Disconnect the negative battery cable with a 12mm socket and ratchet
2. Disconnecting the Starter
Remove the lower 10mm bolt from the starter heat shield
Push the heat shield out of the way
Disconnect the yellow starter wiring harness
Remove the 13mm nut from the red starter wire
Pull off the red starter wire
3. Removing the Driveshaft
Have an assistant hold the driveshaft or put the transfer case into four wheel drive
Remove the 8mm bolts from the front of the driveshaft
Pry the driveshaft out of the transmission with a hammer and screwdriver
Remove the 8mm bolts from the rear of the driveshaft
Pry the rear of the driveshaft out with a hammer and screwdriver
Pull the driveshaft down and out
4. Removing the Starter
Remove the two 15mm bolts from the starter bracket
Pull the bracket down and out
Remove the two 15mm bolts from the starter
Remove the 10mm bolt from the heat shield
Pull the heat shield down and off
Pull the starter down and out
5. Installing the Starter
Put the starter into place
Put the heat shield into place
Insert the 10mm bolt removed in Step 4 into the heat shield
Insert the two 15mm bolts into the starter
Connect the red wire to the starter
Fasten the 13mm nut onto the red wire
Connect the yellow wire to the starter
Put the heat shield into place
Insert the 10mm bolt removed in Step 2 into the heat shield
Put the starter bracket into place
Insert the two 15mm bolts into the bracket
6. Installing the Driveshaft
Feed the driveshaft into place, starting at the rear
Have an assistant hold the driveshaft in place
Insert the 8mm bolts at the front of the driveshaft
Insert the 8mm bolts at the rear of the driveshaft
7. Connecting the Battery
Connect the negative battery cable with a 12mm socket and ratchet
Brought to you by 1AAuto.com, your source for quality replacement parts and the best service on the Internet.
Hi, I'm Don from 1A Auto. I hope this how-to video helps you out, and next time you need parts for your vehicle, think of 1AAuto.com. Thanks.
In this video, we're going to show you how to replace a starter on this 2006 Jeep Liberty. The items you'll need for this is a flat blade screwdriver; an 8 millimeter, 10 millimeter, 13 millimeter and 15 millimeter socket and ratchet; 15 millimeter wrench; a hammer; and jack and jack stands. It's not required, but it does help to have a second person help you out on this.
Start off using a 12 millimeter socket and ratchet and disconnect your negative battery cable.
Your starter is located right here. You want to start off by removing the lower bolt on the heat shield connected to your starter. It's going to be 10 millimeters. Now you just, for now, push that heat shield up and out of the way. Now you have access to these harnesses. On the yellow one, just push the tab on the clip and pull it free. For this red one, it's held on with a 13 millimeter nut. We'll just fast forward as Don removes that nut and then pulls the wire off the stud.
You'll need to remove your front drive shaft to get some clearance. It's held in by a bunch of 8 millimeter bolts. You'll either want somebody to hold it or put your transfer case in four wheel drive and hold the brakes in order to hold those bolts and then just loosen them up one at a time. Loosen the front first and then the rear. Using your hammer and a flat blade screwdriver, break that front part free. We'll just fast forward as Don removes the 8 millimeter bolts on the other side. It helps to have another person holding the drive shaft wile someone else removes the bolts but you can brace it yourself. Now again, use a hammer and a flat blade screwdriver and break this in free. Then you just pull this down and out.
Now, on this bracket right here, you'll see there's two 15 millimeter bolts. You want to go ahead and remove both of those. Pull that bracket back and out of the way. This gives you access to the two 15 millimeter bolts on the starter. For the top one, you can see we used a piece of pipe for some extra leverage to break it free. Then, using a regular socket and ratchet, we removed it most of the way. Once we got to a certain point, the ratchet didn't fit anymore so we had to go 15 millimeter wrench. For the lower one, it's just as simple as using a 15 millimeter socket and ratchet. Once you've removed those bolts, turn your starter so you have better access to this 10 millimeter bolt holding on your heat shield. Just remove that real quick. Once it's removed, pull your heat shield down and off. Then you can pull your starter out.
Now, feed your new starter up into place and replace your heat shield and the 10 millimeter bolt you removed last. We'll just fast-forward as he tightens that up. Now, put your starter into place. Replace those two 15 millimeter bolts. We're going to fast forward as he replaces both of them and tightens them up. You can see he's going to use a wrench for the top one. You want to make sure that these are nice and tight. Now, push that red wire back onto the stud and replace that 13 millimeter nut and tighten that up. Push the yellow wire back into place and push your heat shield down. Replace that 10 millimeter bolt. Tighten that up and then push your bracket back into place and replace those two 15 millimeter bolts.
Now, feed your drive shaft back up into place. You want to feed the back end of it in first and fit it up and over where it's supposed to go. Push the front end of the drive shaft back into place and lower the back end down where it needs to be. Now, you just want to replace those 8 millimeter bolts. We'll just fast forward as Don does this. You want to stop the wheel from moving so this won't turn so you can tighten the bolts up. Having a second person to hold the wheel or bracing it some other way just so it can't move. You want to repeat the process on the other end. Again, we'll just fast forward as Don replaces those 8 millimeter bolts. Torque those to 12 to 14 foot-pounds.
Reconnect your negative batter cable and make sure you tighten it up.
We hope this video helps you out. Brought to you by www.1AAuto.com, your source for quality replacement parts and the best service on the Internet. Please feel free to call us toll-free, 888-844-3393. We're the company that's here for you on the Internet and in person.
STA03106
In Stock
Product Reviews
Loading reviews
5.00/ 5.01
1review
5 Stars
4 Stars
3 Stars
2 Stars
1 Star
1
0
0
0
0
GREAT
Michael
April 18, 2023
GREAT PRICE AND COMPANY TO DEAL WITH
Customer Q&A
No questions have been asked about this item.
Customer service
877-844-3393
Monday - Friday 8:00am - 9:30pm ET Saturday - Sunday 8:00am - 4:30pm ET
Jeep is a registered trademark of FCA US LLC. 1A Auto is not affiliated with or sponsored by Jeep or FCA US LLC.See all trademarks.
Enter Vehicle Year Make Model
Specify your vehicle's year, make and model to guarantee fit.
Year
Make
Model
Options
Drivetrain
This part doesn’t fit a . Select from parts that fit.